上一章我们分析了Activity启动的时候调用setContentView加载布局的过程,但是分析过程中我们留了两个悬念,一个是将资源文件中的layout中xml布局文件通过inflate加载到Activity中的过程,另一个是开始测量、布局和绘制的过程,第二个我们放到measure过程中分析,这一篇先分析第一个inflate过程。
Android系统源码分析–View绘制流程之-setContentView
Android系统源码分析–View绘制流程之-inflate
Android系统源码分析–View绘制流程之-onMeasure
Android系统源码分析–View绘制流程之-onLayout
Android系统源码分析–View绘制流程之-onDraw
Android系统源码分析–View绘制流程之-硬件加速
Android系统源码分析–View绘制流程之-addView
Android系统源码分析–View绘制流程之-弹性效果
LayoutInflater.inflate方法基本上每个开发者都用过,也有很多开发者了解过它的两个方法的区别,也有一些开发者去研究过源码,我这里再重复分析这个方法的源码其实一是做个记录,二是指出我认为的几个重点,帮助我们没有看过源码的人去了解将xml布局加载到代码中的过程。这里我们需要重点关注三个问题,然后根据对源码的分析来解决这三个问题,帮助我们详细了解inflate的过程及影响,那么这篇文章的目的就达到了。
问题:
LayoutInflater.inflate两个个方法是什么?
这两个方法会给我们的视图显示带来什么影响?
View视图的宽、高是什么时候解析的?
第一个问题:LayoutInflater.inflate两个个方法是什么?
这个问题是最简单的,基本上这两个方法都使用过,但是使用的结果却是不一样的。下面我贴出来这两个方法的代码:
1
2
3
public View inflate (@LayoutRes int resource, @Nullable ViewGroup root) public View inflate (@LayoutRes int resource, @Nullable ViewGroup root, boolean attachToRoot)
虽然是两个方法,但是第一个方法最终会调用第二个方法:
1
2
3
public View inflate (@LayoutRes int resource, @Nullable ViewGroup root) { return inflate(resource, root, root != null ); }
调用第二个方法的时候第三个参数是与第二个参数ViewGroup是否为空有关的,这个参数具体作用我们后面代码流程分析再说。我们先看使用的几种情况:
1 2 3 4 5 6 7 8 9 10 11 12 13 14 15 16 17 LayoutInflater.from(mContext).inflate(R.layout.screen_simple, mParentView); LayoutInflater.from(mContext).inflate(R.layout.screen_simple, null ); LayoutInflater.from(mContext).inflate(R.layout.screen_simple, mParentView, false ); LayoutInflater.from(mContext).inflate(R.layout.screen_simple, mParentView, true ); LayoutInflater.from(mContext).inflate(R.layout.screen_simple, null , false ); LayoutInflater.from(mContext).inflate(R.layout.screen_simple, null , true );
这里罗列了所有用法,但是不同的用法可能对我们的显示效果是有影响的,那么就到了第二个问题,下面通过分析代码过程来看看到底有什么影响。还有第三个问题,是我之前面试的时候被问到的,之前看inflate源码没有很详细,所以没有回答上来,这次也一起分析一下,这个宽、高可能很多人觉得是和其他属性一起解析的,其实不是,这个是单独解析的,就是因为View的宽、高是单独解析的,所以会有一些问题出现,可能有些开发者也遇到这个坑,通过这篇文章分析你会的到答案,并且可以准确填上你的坑。
在上面六种情况中是有一样的:
如果mParentView不是null,那么:1、4是一样的,2、5是一样的,3是一样,6是一样,
如果mParentView是null,那么:1、2、3、5是一样,4、6是一样的。
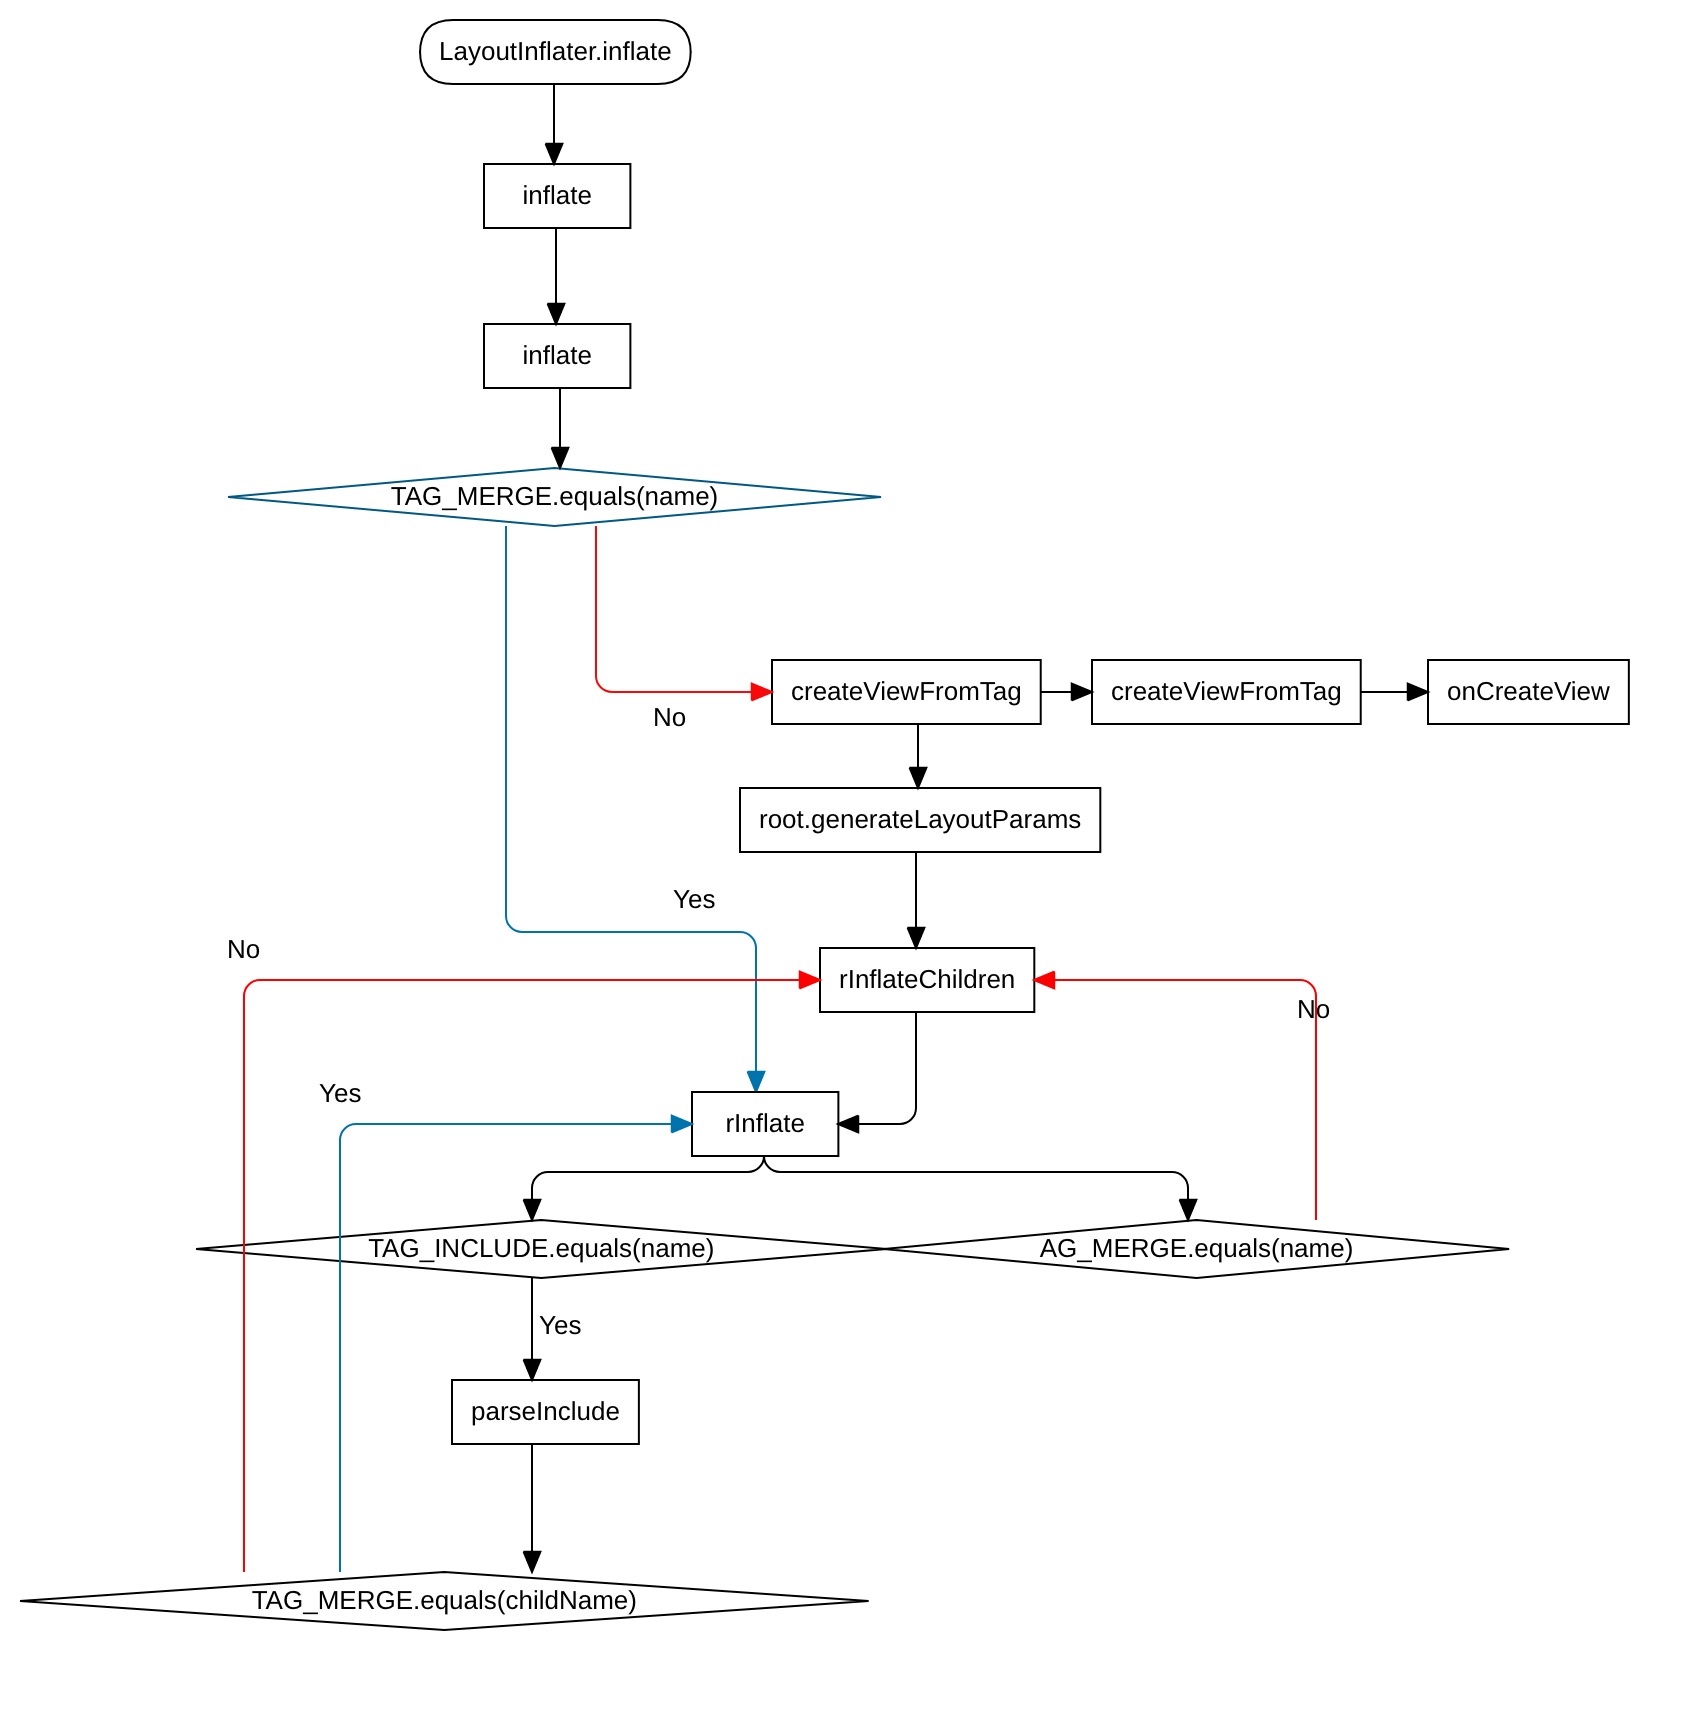
代码流程 先看一张流程图:
1.LayoutInflater.inflate 1 2 3 4 5 6 7 8 9 10 11 12 13 public View inflate (@LayoutRes int resource, @Nullable ViewGroup root) { return inflate(resource, root, root != null ); } public View inflate (@LayoutRes int resource, @Nullable ViewGroup root, boolean attachToRoot) { final Resources res = getContext().getResources(); final XmlResourceParser parser = res.getLayout(resource); try { return inflate(parser, root, attachToRoot); } finally { parser.close(); } }
前面提到了inflate方法调用最终调用到第二个是三个参数的方法,只不过第三个参数是与第二个参数有关系的,这个关系就是root是不是null,如果不是null,传递true,反之传递false。
2.LayoutInflater.inflate 1 2 3 4 5 6 7 8 9 10 11 12 13 14 15 16 17 18 19 20 21 22 23 24 25 26 27 28 29 30 31 32 33 34 35 36 37 38 39 40 41 42 43 44 45 46 47 48 public View inflate (XmlPullParser parser, @Nullable ViewGroup root, boolean attachToRoot) { synchronized (mConstructorArgs) { ... View result = root; try { int type; ... final String name = parser.getName(); ... if (TAG_MERGE.equals(name)) { if (root == null || !attachToRoot) { throw new InflateException ("<merge /> can be used only with a valid " + "ViewGroup root and attachToRoot=true" ); } rInflate(parser, root, inflaterContext, attrs, false ); } else { final View temp = createViewFromTag(root, name, inflaterContext, attrs); ViewGroup.LayoutParams params = null ; if (root != null ) { params = root.generateLayoutParams(attrs); if (!attachToRoot) { temp.setLayoutParams(params); } } rInflateChildren(parser, temp, attrs, true ); if (root != null && attachToRoot) { root.addView(temp, params); } if (root == null || !attachToRoot) { result = temp; } } } catch (XmlPullParserException e) { ... } return result; } }
这里开始layout布局的最开始解析,首先if语句是判断根视图,也就是最外层视图是merge标签的时候,必须传入的root不是null,并且第三个参数attachToRoot必须是true,否则抛出异常。如果root不为null,并且attachToRoot==true,那么调用rInflate方法继续解析。如果不是merge标签,那么解析过程由外向内开始解析,所以首先解析最外层的根视图并保存为temp,这里如果root不是null,那么就要获取LayoutParam属性,这个方法下面再看,然后判断如果attachToRoot是false的话那么就给temp设置属性,如果为true就没有设置。然后调用rInflateChildren方法递归解析temp下面的所有视图,并按树形结果添加到temp中。接着判断root不为null,并且attachToRoot为true,那么将temp添加到root中并且设置属性值,所以这里可以看出,attachToRoot参数是是否将解析出来的layout布局添加到root上面,如果添加则会有属性值。
所以这里的重点就是root决定layout布局是否被设置ViewGroup.LayoutParams属性,而attachToRoot决定解析出来的视图是否添加到root上面。 这里我们先看获取的ViewGroup.LayoutParams属性包含了那几个属性值。
3.ViewGroup.generateLayoutParams 1 2 3 public LayoutParams generateLayoutParams (AttributeSet attrs) { return new LayoutParams (getContext(), attrs); }
这里只是new了一个新对象LayoutParams,我们看看这个LayoutParams对象的构造函数做了什么
1 2 3 4 5 6 7 public LayoutParams (Context c, AttributeSet attrs) { TypedArray a = c.obtainStyledAttributes(attrs, R.styleable.ViewGroup_Layout); setBaseAttributes(a, R.styleable.ViewGroup_Layout_layout_width, R.styleable.ViewGroup_Layout_layout_height); a.recycle(); }
这里调用setBaseAttributes函数:
1 2 3 4 protected void setBaseAttributes (TypedArray a, int widthAttr, int heightAttr) { width = a.getLayoutDimension(widthAttr, "layout_width" ); height = a.getLayoutDimension(heightAttr, "layout_height" ); }
到这里基本明确了,这里就是获取视图的宽、高属性值的,也就是我们layout布局中视图的宽、高值。宽、高包括以下几种:
1 2 3 public static final int FILL_PARENT = -1 ;public static final int MATCH_PARENT = -1 ;public static final int WRAP_CONTENT = -2 ;
只有具体值,也就是我们设置的layout_width和layout_height值,其实上面第一种已经被第二个取代了。
所以我们这里看到了视图的宽、高就是通过ViewGroup.generateLayoutParams来获取的,如果没有调用那么解析的视图就没有有效的宽、高,如果需要具体值就要自己手动设置了。也就是在调用LayoutInflater.inflate方法的时候想让自己设置的宽、高有效,传入root就不能是null,否则不会获取有效的宽、高参数,在后面显示视图的时候系统会配置默认的宽、高,而不是我们设置的宽、搞。这个后面会再分析。
还有一种情况就是我想获取宽、高,但是不想添加到root上,而是我手动添加到别的ViewGroup上面需要怎么办,那就是调用三个参数的inflate方法,root参数不是null,attachToRoot设置为false就可以了
4.LayoutInflater.rInflate 1 2 3 4 5 6 7 8 9 10 11 12 13 14 15 16 17 18 19 20 21 22 23 24 25 26 27 28 29 30 31 32 33 34 35 36 37 38 39 40 41 42 43 44 void rInflate (XmlPullParser parser, View parent, Context context, AttributeSet attrs, boolean finishInflate) throws XmlPullParserException, IOException { final int depth = parser.getDepth(); int type; while (((type = parser.next()) != XmlPullParser.END_TAG || parser.getDepth() > depth) && type != XmlPullParser.END_DOCUMENT) { if (type != XmlPullParser.START_TAG) { continue ; } final String name = parser.getName(); if (TAG_REQUEST_FOCUS.equals(name)) { parseRequestFocus(parser, parent); } else if (TAG_TAG.equals(name)) { parseViewTag(parser, parent, attrs); } else if (TAG_INCLUDE.equals(name)) { if (parser.getDepth() == 0 ) { throw new InflateException ("<include /> cannot be the root element" ); } parseInclude(parser, context, parent, attrs); } else if (TAG_MERGE.equals(name)) { throw new InflateException ("<merge /> must be the root element" ); } else { final View view = createViewFromTag(parent, name, context, attrs); final ViewGroup viewGroup = (ViewGroup) parent; final ViewGroup.LayoutParams params = viewGroup.generateLayoutParams(attrs); rInflateChildren(parser, view, attrs, true ); viewGroup.addView(view, params); } } if (finishInflate) { parent.onFinishInflate(); } }
上面第2步中,如果根标签是merge那么直接调用这个方法继续解析下一层,这里有五种情况,前两种我们不分析,基本不用,我们分析下面我们常用的:如果是include标签,那么就要判断include的层级,如果include下没有其他层级,那么会抛出异常,也就是include下必须有layout布局,然后会调用parseInclude来解析include标签的布局文件;另外就是merge嵌套merge也是不行的,会抛出异常;最后就是正常视图,通过createViewFromTag来创建该视图,然后解析宽、高,这里是直接解析了,只有最外层是要判断root的,然后调用rInflateChildren,这里rInflateChildren还是会调用这里的方法,也就是形成递归解析下一层视图并添加到外面一层视图上面,这里都是有宽、高属性的。最后有一个if语句,这里的意思是每个ViewGroup下面的所有层级的视图解析完成后,会调用这个ViewGroup的onFinishInflate方法,通知视图解析并添加完成,所以我们在自定义ViewGroup的时候可以通过这个方法来判断你自定义的ViewGroup是否加载完成。
下面我们再看parseInclude方法是如何解析include标签视图的
5.LayoutInflater.parseInclude 1 2 3 4 5 6 7 8 9 10 11 12 13 14 15 16 17 18 19 20 21 22 23 24 25 26 27 28 29 30 31 32 33 34 35 36 37 38 39 40 41 42 43 44 45 46 47 48 49 50 51 52 53 54 55 56 57 58 59 60 private void parseInclude (XmlPullParser parser, Context context, View parent, AttributeSet attrs) throws XmlPullParserException, IOException { int type; if (parent instanceof ViewGroup) { ... if (layout == 0 ) { final String value = attrs.getAttributeValue(null , ATTR_LAYOUT); throw new InflateException ("You must specify a valid layout " + "reference. The layout ID " + value + " is not valid." ); } else { ... try { ... final String childName = childParser.getName(); if (TAG_MERGE.equals(childName)) { rInflate(childParser, parent, context, childAttrs, false ); } else { final View view = createViewFromTag(parent, childName, context, childAttrs, hasThemeOverride); final ViewGroup group = (ViewGroup) parent; ... ViewGroup.LayoutParams params = null ; try { params = group.generateLayoutParams(attrs); } catch (RuntimeException e) { } if (params == null ) { params = group.generateLayoutParams(childAttrs); } view.setLayoutParams(params); rInflateChildren(childParser, view, childAttrs, true ); ... group.addView(view); } } finally { childParser.close(); } } } else { throw new InflateException ("<include /> can only be used inside of a ViewGroup" ); } ... }
这里首先判断include标签的上一个层级是不是ViewGroup,如果不是那么抛出异常,也就是include必须在ViewGroup内使用。如果是在ViewGroup中使用,那么接着判断layout的id是否有效的,如果不是,那么就要抛出异常,也就是include必须包含有效的视图布局,然后开始解析layout部分视图,如果跟布局是merge,那么调用解析对应merge的方法rInflate,也就是步骤4,如果是正常的View视图,那么通过createViewFromTag方法获取视图,然后获取include标签的宽、高,如果include中没有设置才获取include包含的layout中的宽、高,也就是include设置的宽、高优先于layout指向的布局中的宽、高 ,所以这里要注意了。获取完成会设置对应的宽高属性,然后调用rInflateChildren递归完成layout下所有层级视图的加载。基本的逻辑就差不多了,其实并不复杂,还有个方法需要简单介绍下-createViewFromTag,根据xml中的标签也就是视图的名字加载View实体。
6.LayoutInflater.createViewFromTag 1 2 3 4 5 6 7 8 9 10 11 12 13 14 15 16 17 18 19 20 21 22 23 24 25 26 View createViewFromTag (View parent, String name, Context context, AttributeSet attrs, boolean ignoreThemeAttr) { ... try { View view; ... if (view == null ) { ... try { if (-1 == name.indexOf('.' )) { view = onCreateView(parent, name, attrs); } else { view = createView(name, null , attrs); } } finally { ... } } return view; } catch (InflateException e) { ... } }
这个方法里有两行注释,我解释一下,我们在xml布局中有两种写法,一种是系统自带的视图,例如:FrameLayout,LinearLayout等,一种是自定义的或者是Support包中的也就是带有包名的视图:
1 2 3 4 5 6 7 8 9 10 11 12 13 14 15 16 17 <?xml version="1.0" encoding="utf-8" ?> <RelativeLayout xmlns:android="http://schemas.android.com/apk/res/android" android:layout_width="match_parent" android:layout_height="match_parent" > <android.support.v7.widget.RecyclerView android:id="@+id/recyclerview" android:layout_width="match_parent" android:layout_height="match_parent" android:layout_below="@+id/header_rl" android:scrollbars="vertical" /> <ProgressBar android:id="@+id/progress" android:layout_centerInParent="true" android:layout_width="wrap_content" android:layout_height="wrap_content" /> </RelativeLayout>
上面这个布局就是包含两种,系统自带的就是ProgressBar,还有就是带有包名的,这两种解析方法是有区别的。系统自带的用onCreateView方法创建View,带有包名的通过createView方法创建。我们先看第一个:
7.LayoutInflater.onCreateView 1 2 3 4 5 protected View onCreateView (String name, AttributeSet attrs) throws ClassNotFoundException { return createView(name, "android.view." , attrs); }
系统的视图都在android.view包下,所以要添加前缀“android.view.”,添加完也是完整的视图名称,就和自定义的是一样的,最终还是调用createView方法:
8.LayoutInflater.createView 1 2 3 4 5 6 7 8 9 10 11 12 13 14 15 16 17 18 19 20 21 22 23 24 25 26 27 28 29 30 31 32 33 34 35 36 37 38 39 40 41 42 43 public final View createView (String name, String prefix, AttributeSet attrs) throws ClassNotFoundException, InflateException { ... Class<? extends View > clazz = null ; try { if (constructor == null ) { clazz = mContext.getClassLoader().loadClass( prefix != null ? (prefix + name) : name).asSubclass(View.class); ... constructor = clazz.getConstructor(mConstructorSignature); ... } else { if (mFilter != null ) { Boolean allowedState = mFilterMap.get(name); if (allowedState == null ) { clazz = mContext.getClassLoader().loadClass( prefix != null ? (prefix + name) : name).asSubclass(View.class); ... constructor = clazz.getConstructor(mConstructorSignature); ... } else if (allowedState.equals(Boolean.FALSE)) { ... } } } ... final View view = constructor.newInstance(args); ... return view; } catch (NoSuchMethodException e) { ... } }
这里就很简单了就是根据完整的路径名称加载出对应的Class文件,然后创建对应的Constructor文件,通过调用Constructor.newInstance创建对应的View对象,这就是将xml文件解析成java对象的过程。
总结 LayoutInflate.inflate方法很重要,这是我们将xml布局解析成java对象的必须过程,所以掌握这个方法的原理非常重要,上面分析的时候也提出一些重点的内容,所以我们再总结一下,方便记忆:
inflate方法的第二个参数root不为null,加载xml文件时根视图才有具体宽、高属性;
inflate方法的第三个参数attachToRoot是true时,解析的xml布局会被添加到root上,反之不添加;
调用两个参数的inflate方法时,参数attachToRoot = (root != null);
include设置的宽、高优先于layout指向的布局中设置的宽、高;
include不能是根标签;
merge必须是根标签
include必须有有效的layout id
代码地址: 直接拉取导入开发工具(Intellij idea或者Android studio)
Android_Framework_Source
注 Android开发群:192508518
微信公众账号:Code-MX
注:本文原创,转载请注明出处,多谢。